A sitemap has two main purposes. Publically accessible sitemaps are sometimes put on websites so users can see the site's structure and easily find information. Search engines also use sitemaps—in this case, website owners can use them to tell Google and other search engines where to find the pages of their website.
So, essentially, a sitemap is a list of links with other information. The sitemap format that Google recommends is XML, so this tutorial will cover creating a basic XML sitemap and uploading it to Google Webmaster Tools for Google to use. This process is ideal for small sites with simple structures.
Create the Sitemap
Here is an example of a sitemap, and below, we will go through it in more detail. You can use this as the basis of your own sitemap.
<?xml version="1.0" encoding="UTF-8"?><urlset xmlns="http://www.sitemaps.org/schemas/sitemap/0.9">
<url>
<loc>http://www.YourDomain.com/</loc>
<lastmod>2015-11-01</lastmod>
<changefreq>weekly</changefreq>
<priority>1.0</priority>
</url>
<url>
<loc>http://www.YourDomain.com/Services</loc>
<changefreq>monthly</changefreq>
</url>
<url>
<loc>http://www.YourDomain.com/About</loc>
<lastmod>2015-01-01</lastmod>
<changefreq>yearly</changefreq>
</url>
<url>
<loc>http://www.YourDomain.com/Contact</loc>
<lastmod>2015-01-01</lastmod>
<priority>0.3</priority>
</url>
</urlset>
This is for a website with four pages:
1. Home
2. Services
3. About
4. Contact
The opening tag of the sitemap is <urlset> with a parameter showing that it is following Sitemap Protocol 0.9 from SiteMaps.org.
After this, you start listing your URLs using the <url> tag. A number of tags can be applied to each URL:
· <loc> – you will need this as it is the basis of your sitemap. It is the URL of the page, and must start with http://
· <lastmod> – the date you last modified the page, in the YYYY-MM-DD format.
· <changefreq> – with this tag you can tell Google how often the page changes. Google will still decide how often to crawl it, but this gives it a guide. The options you have are: always, hourly, daily, weekly, monthly, yearly, and never. Always is for a page that changes each time it is accessed (an example would be a social media timeline page). Never is for archived pages on your website.
· <priority> – this is another way you can tell Google how important you think the page is. It will make its own decision on crawl frequency, but the priority setting is taken into account. It can be a value between 0.0 and 1.0, with 1.0 being the highest.
You can use a text editor like Notepad to create your sitemap.
Save and Upload
Save your sitemap with the filename "sitemap.xml". You should then upload it to the root directory of your server. This will give your sitemap the URL: YourDomain.com/sitemap.xml.
Upload to Google Webmaster Tools
Follow these steps to upload to Google Webmaster Tools:
· Log into the Google Search Console
· Select your website
· Click on Sitemaps
· Click the red button labelled ADD/TEST SITEMAP
· If you uploaded the sitemap file to the root directory as mentioned above, all you have to type here is sitemap.xml
· Click Submit Sitemap
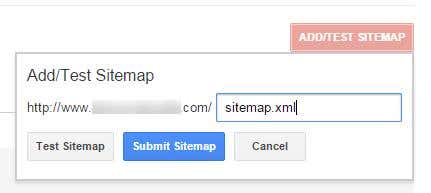
You can also test the sitemap before submitting it. Your sitemap will now be available for future reference in the Google Search Console.